Showing posts with label Northern Flurry embosslit. Show all posts

Tuesday, December 11, 2012

TST #96

Here is another Christmas Card as promised for this weeks Try Stampin on Tuesday.

Did you get a chance to check out our great new Design Team last week.  If not now is your chance.  We have even more Designers than ever before and I'm sure that you will recognize a name or two on the list.


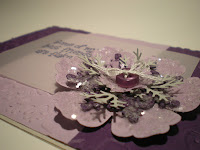
This card I have made especially for a co-worker who lives for Purple.  I try and make all of her cards with that in mind and this one will be no different.  She also like Bling so I have added just a hint of that with the snowflake embellishment.
 
I started with the Northern Flurry's die and punched out the snowflakes in the two shades of purple.  Then using the MS Branch Punch I punched out these in a soft grey colour.  They almost look silver when you put them with the purple.  Then I spread regular clear glue onto the surfaces and sprinkled Mica Flakes over them.  Once they were dry I layered them and set them up onto a Blossom Punch piece that had been sparkled up as well.    

I hope you like what I have come up with.  Now it's your turn.  If you need a little inspiration check out the other Designers at Try Stampin on Tuesday.  Don't forget to post your version of this sketch on the site as well.

Thanks for stopping by.

Nancy

Your comments mean a lot to me so please remember to leave one. 


Friday, December 9, 2011

Christmas Buckle Card

If you know me then you know that I enjoy making cards that have unusual folds or something special about them when they open up.  This card is just one of those special cards.

I used two pieces of CS one plain and the other a DSP.  You can use whatever you like and maybe stamp on one side rather than using DSP. Each piece measured 8 1/2" x 4 1/4".  The DSP was scored and folded at 4 1/4".  The plain was scored at 3" and 6".  I ran it through my Cuttlebug with the SU Northern Flurry embossing folder.  Then using the SU Northern Frost die I cut out 3 snowflakes, along with the SU Thanks Embosslit in white CS.  Place the snowflakes were you want now before adhering CS together.  That way you will not see the backside of the brads that hold the snowflakes on the front of the card.  Now fold the plain CS and adhere the two 3" sides together.

On the patterned paper cut a slice along the scored line measuring 1 1/4". This will be were you insert the buckle piece.   Cut a strip that measures 1 1/2" x 5" of plain CS. This will be your buckle piece.  Adhere the buckle piece to the inside of the card through the slit that you made on the DSP. Then sandwich the plain CS inside the patterned CS and adhere all the layers together.

With a pencil lightly mark on the front of the card were the buckle comes across the front of the plain CS. Using the SU Word Window punch, punch a hole through the two layers.  This may be difficult so make sure you are on a good solid surface to be able to punch.

Punch out using the SU Word Window punch a piece of the plain CS. This piece will cover the "Thanks" on the embosslit piece.  Make a sandwich of the Thank You embosslit piece, word window piece and then the snowflake and secure with another brad.  Adhere this piece to the front of the buckle.

Your buckle card is now complete.  Congratulations!

Hope you enjoy!

Nancy