Showing posts with label Snowflakes. Show all posts

Monday, December 16, 2013

HOC C&S Happy Holidays Blog Hop

Welcome to the House of Cards Term One Blog Hop!  If you've come here from Mia's blog, then you are in the right place!  If you have just stumbled here and would like to participate, please hop over to the House of Cards challenge blog to get started! We've got some fabulous sponsors that are providing prizes, so make sure to leave comments at each stop for a chance to win!

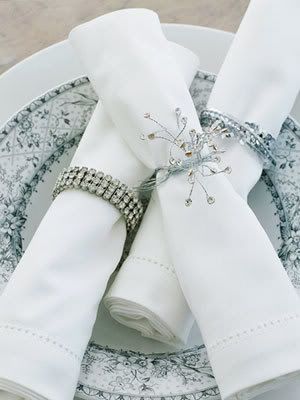
http://i42.photobucket.com/albums/e325/pballrsgirl/white%20christmas/bhg7.jpg
This challenge is a photo inspiration challenge and is open from December 1-15.  It is an Anything Goes so you can make a card, decoration or anything else that you might think of that is inspired by this photo.

I can just imagine the great dinner that will be part of this elaborate diner plate.  The Holiday Season is a special time of year for everyone.  No matter what your celebration is, it is  time to reflect back on the past year and its challenges and achievements and to look ahead at what the following year may bring.  It is also time to spend with those that you love and cherish and remember those no longer with us, that make this Holiday and special one.

I love the colours of this photo, but trying to guess just which colours I should use became a bit of an adventure.  There were several attempts at getting just the right colours to accent the photo  but I finally came up with Night of Navy and black with a touch of bling!  I also kept within my House of Cards theme of Clean and Simple.

To start I cut out a mask from a Post-it and used that to create the shadowed area.  Then with the Night of Navy I inked up the snowflake stamp and then with the Black I lightly "bammed" it.  This allowed some of the areas to appear even darker with just a hint of black.
 
Once the outside was complete I stamped on the inside just in one corner to finish off the card.
 A touch of bling was added to the centre of three snowflakes and then it was mounted onto accent DSP and then the card base.  
Once I had the colours the rest came together rather quickly which was good because I needed to make 50 of these cards for friends and family!


House of Cards Design Team
One last note.  I would like to personally wish each and every one of you a Safe and Happy Holiday and only good things for the coming year!

Nancy

Thanks for stopping by!  Please join in the fun of our hop and make your way over to Daen'Ys blog.

Pet Lovers "Paw"fect Card

Ok sorry for the pun but I just had to.

A couple of weeks ago for the House of Cards final challenge I make a card with the Snowflakes stamp that I had and I thought what a great idea for my groomers card.  I cut out a template for a paw print and then sponged the openings of the template.  Then using the snowflakes stamp I stamped over the template so that the snowflakes would only show on the paw print.


Of course this card will accompany the usual treat of "Bark", fitting once again for the girls there as they all have a sweet tooth.

Enjoy Ladies!!

Thanks for stopping by.

Nancy

Your comments mean a lot to me to please remember to leave one.

Tuesday, November 26, 2013

TST Something Different & the start of a "Blue Christmas"

Yes todays challenge at Try Stampin on Tuesday is a little different.  We have no sketch or colour challenge for you to follow.  We all are doing our own thing, BUT we are all making tags with instructions on how we achieved them.  I hope that you will find my tag cheerful and give one a try on your own.
Supplies Needed:
tag (or cut one to your own size and shape)
stamp set
embossing powder, heat gun
inks
SU Decorative Strip Northern Frost
SU Decorative Strip Join in the Cheer
SU Snow Flurry Bigz
glue and dimensionals
bling

Start by stamping your tag using Versamark and then heat emboss it using clear or 
coloured embossing powder. 
Sponge your tag using the accenting colours of your card stock (CS).
Next cut out all of your snowflakes.  I used two shade of blue and then vanilla CS for my flakes.
After cutting out the vanilla flakes I stamped them using the darkest ink and then sponged them.
With the largest flake adhere it to your tag and then with the second largest flake adhere it to the side.  
These will become your anchors for the remaining flakes.
Start assembling your flakes using alternate colours, ie., dark blue, vanilla, light blue (any variation of these colours)
Don't be afraid to shape your flakes to give them even more dimension.
Once you have them all put together start placing them onto the tag.
Add a little bling in the centre of each flake as well.

The last thing you will do will be adhere the sentiment.  
 First thought was going for a dark blue, but it didn't show up as well so plan B 
add the Peace and Joy in the lighter blue.
The edges of the Peace and Joy were sponged with the darker blue.

I wanted lots of layers for this tag and I think I have achieved this. 

Each year I decorate my tree in a different colour.  My daughter calls my tree the "Martha Stewart" tree.  Over the years we made ornaments for the kids with the kids and now they have all of their own ornaments and I can have the designer tree that I want.

Over the next few weeks the majority of my Christmas creations will be in the blue colours so I guess that means I will be having a blue tree as well.  Guess you will have to wait and see what my, as Elvis would say, "Blue Christmas" will look like.  

So now "TAG" your it. Let's see what kind of tags you come up with and don't forget to post them on our site to show everyone your great talent!

Thanks for stopping by.  

Nancy

Your comments mean a lot to me so please remember to leave one.